Sunday, March 16, 2014

Adding a third party router behind an ATT Uverse 3801HGV

First of all, there is quite a bit of miss information out there that is completely and entirely incorrect.  First of all, if you have changed a bunch of settings trying to get this to work you might need to reset your router to factory defaults.  While I was trying and failing over and over again, I actually disabled all the tvs in my house.  (opps!)

Next because of the way ATT uses the network to send video to your TVs and STBs, you cannot put the ATT uverse router into a "modem mode" or "Bridge Mode." You have to put your 3rd party router behind the Uverse router. (please see the diagram below) Don't worry you can still set this up, and I will walk you through it.

Some of the reasons why you might want to do this.
#1.  Gigabit local networking
#2.  Wireless N
#3. Add a router that supports DLNA from an attached USB drive
#4.  Any reason at all really...

So the first step is to define what we are talking about.

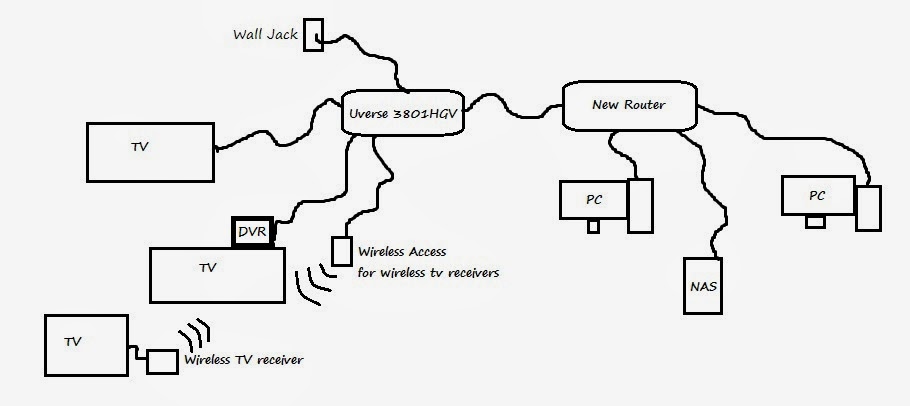
#1.  3801HGV - This is your att router
#2.  Wireless Access Point - Wireless Transmitter for Uverse TV service if you have wireless receivers.
#3.  New Router - This is the name I am calling the router you would like to add to your setup.

So here is a layout of a typical setup.  This is the end state that you want when finished.


First only disconect devices that are not from ATT from the 3801HGV.  If you add them to your new router ATT will not be able to see them and you will lose your TV from those devices that you unplugged.

1# So your next step would be to attach a pc through a wired connection to your new router.  Do not hook this router to your 3801HGV yet.  This can cause serious problems if you do.  (If you already did this and you lose internet connectivity, disconnect the new router and reboot both of them.  Unplug and plug the power cord back in if you do not know what I mean.)

Log into the admin settings on your new router.  This is typically 192.168.1.1.  Go to your router address settings.  This would typically be the 192.168.1.1 address.  When you find this number you will need to change it to something else.  I used 172.16.0.0 Use the subnet mask of 255.255.255.0 or just do not change it at all.  Whatever you change this IP to remember it. You will need it in a few moments.  Don't forget to save your changes.  

Next unplug your network cable from your new router and plug you PC into the 3801HGV.  The default IP for this router is 192.168.1.254  The password is on the side of the router if you have not changed it.  

Now plug a network cable from the internet port of your new router and plug the other end into one of the yellow network ports that are open on the 3801HGV.  

Next in your 3801HGV status page click on settings.  Then click the menu "Lan".  You might have to wait FOREVER for this page to load.  if it doesn't work after 2 minutes click it again.  If that doesn't work close your browser and relog in.  (Whoever wrote this firmware was high or worse).  Once you get to the lan section click "IP address allocation."  Note what the device name is for your new router in the list.  Scroll down if you need to.  It can be a long list. Any of the unknown ones are usually ATT devices.  

Next click the tab that says "Broadband."  Then click "Link Configuration." Scroll to the very bottom of the page.  It should look like this.

Make sure the check box for Add cascaded router is checked.

Add the IP address that you set for your new router in the box marked Network address 172.16.0.0 if you used the one I suggested earlier.  (green) 

Set the Subnet mask as 255.255.255.0 (brown)

Select the dot right below the "Choose router that will host the secondary subnet.

Pick your new router out of the list.  (red)

Click on Save.
Just for goo measure change the network cord back to your new router and reboot the new router.  
To test and make sure everything works.  Try to log into your 3801HGV from your new router using 192.168.1.254.  You should be right into the control panel.  If you are you are done.

If your new router is wireless, I would suggest turning off the 3801HGV wireless.
I hope that this has been helpful.  I know I wish that I had known about this setting when I tried to setup my new router.  The main issue that I had in DMZplus mode was that the IP addresses kept conflicting and whenever I was trying to watch media on a device attached to the new router it would fail.  I would then have to reboot the new router to fix the issue.  This would fix it for about a day and then my connection would slow again to a crawl.  Ever since I have setup the cascaded router, all of my issues have ceased.


Big Save, Deal of the day


Thursday, March 6, 2014

Restoring a 1947 RCA 8-x-541 AM tube radio and adding bluetooth


Steps I took on repairing and updating a 1947 RCA 8-x-541 AM tube radio to include Bluetooth.


First I bought an old (non working) set off of eBay.Look around for a bargain.  There are quite a few out there at low prices if you have the time to tinker.  If not buy a working model and add a BT module to it. 


 First step was to remove all of the electronics and bezels.


Next I had to verify that this was Bakelite.  The easiest and best way is to run the "plastic" under really hot water.  If it smells like formaldehyde, then its Bakelite.

Next I took the case and dials to the tub (literally). Use a mild detergent (dawn) on Bakelite and most likely it will really clean up. (Who knows how many layers of pledge / old English / cigarette smoke have built up over the years).


If its still dull take Brasso to it. You just need a mild polishing paste to really make the Bakelite shine.


Next I did something that I did not find anywhere online to restore Bakelite but it really brought out the shine. I used a car wax on the unit. Buff it out and it looks amazing.


Electronics

I pulled the radio unit out and observed that the am antenna was completely gone.

Also the wires that should have led to the light bulb were completely gone. The power cord was gone too.

So first I put on a new power cord and removed an am antenna out of on old (modern) radio and soldiered it in.  I tried plugging it in but no go. So I put 2 flash light bulbs in series to get the right voltage for the odd 1947 bulb and it fired right up.


The 2 bulbs would not light up though no matter what I tried. I finally just replaced it with a resistor.The tubes are run in series and would not heat up unless you added that.


 I then realized the crazy thing was finally working. I tuned into an am station and all work perfect. I still wanted the radio dial lit up though so I added an old cell phone charger and spliced in the end off of an old extension cord.
Plugged in the cell charger soldiered on a resistor put an led where the old bulb was suppose to be with a generous amount of hot glue. Now the unit stays lit whenever the unit has power but not turned on. Tubes eat up a TON of power. This makes it more of a decorative piece.


Lastly I added an aux line in on the old radio. Looking at the 
potentiometer I found where the input from the am antenna runs to the amp. I did this through trial and error.  If you try this yourself try to use an audio source that you do not care about.  I used a 1990 Sony Walkman.  


Once you found the spot splice in an audio cable and you now have an old radio that you can hook almost anything to. (If you find that the volume knob does not change the volume level of your input keep trying a different input.)


I then plugged in a BT adapter and I was streaming 1940's jazz through my new awesome radio.  


On a side note. This radio is old. Nothing is insulated. The entire unit has 110 running through it. I had to go by trial and error to find the right port to splice into. So beware and attempt this at your own risk. Also I plugged a $8 BT adapter into the plug. I would never risk an iPhone or something that expensive to this until I do a little more testing of voltages.


Anyway it was an awesome weekend project that turned out amazing and also quite useful.


If you want to help support this blog please follow on one of my links below.  Thanks for reading and I hope you learned something.  


ESET NOD32 Antivirus - Save 25%             Save Money, FocalPrice Clearance Center